Friday, 28 February 2014

Elements of the Front Cover - Logo

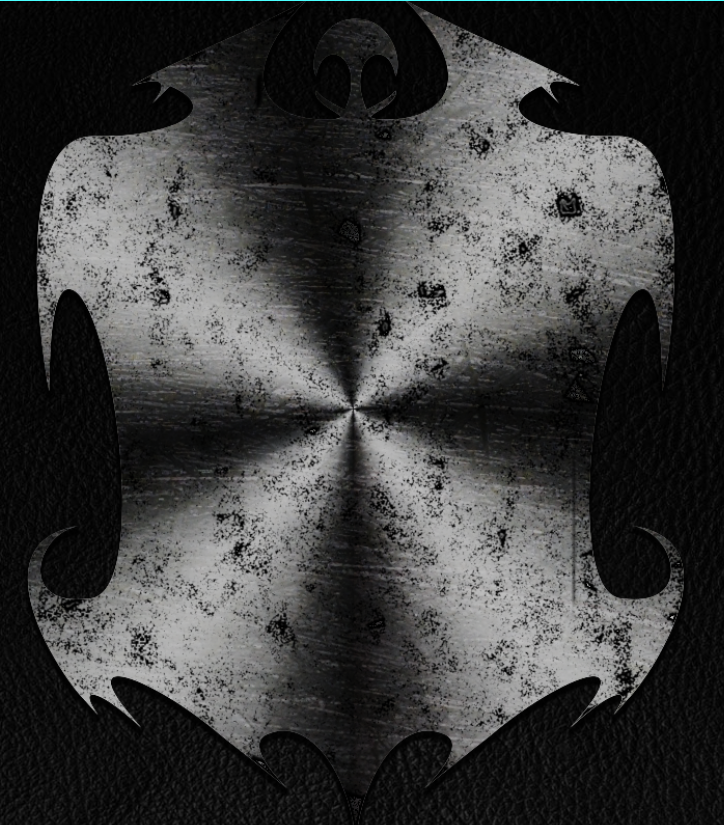
          I left off designing the logo for my cover as I was unsure what design I was going to go for and what tools I was going to need. Looking at other games within the same genre, skulls, armour, weaponry, and fantastical beasts were among the most popular, and after drawing a few initial designs I find myself returning to the shield design. Armour and weaponry resonate with me as they're a large focus in the fantasy genre across all mediums, as they are often works of art with intricate details that reflect the place or people wielding them. A quick google shows you the level of detail that goes into designing shields for films and games, this is the quality I am aiming for with my design. 
          I used the pen tool (for a vector image) to draw the outline of a shield but quickly ran into problems as I am not very skilled with this particular tool, so I placed an outline of a shield into the document as a template but I was still having trouble getting the lines perfect against the shape so I decided to go with my own design. After a making a basic outline, I started tweaking anchor points and finished with a design that looked completely different to the one I had used as a template but I prefer my design as it encapsulates the idea of fantasy. To prevent inconsistencies with my design, I drew only half of the shield allowing me to flip it horizontally and match it against the other half forming the full shield. Finally, I removed the line in the middle by using the direct selection tool, selecting the line and the pressing delete. 


          Initially I placed the outline into Adobe Illustrator and used the offset tool (Object - Path - Offset patch) to shift the design inwards -1mm.However this didn't create one solid outline, I deleted the offending edges and used the pen tool to draw a line between the anchor points and then tweaked them until they followed the curve of the outer shield outline. 


          I placed the outline back into photoshop and followed this tutorial adapting it to my own design. I did use different textures that I felt fitted my shield and overall design better than the guide's suggestion. To finish I used the soft oil pastel brush to draw over the shield design, this gave some texture to the shield and because I didn't 100% cover the shield, the gaps appear to be marks on the shield giving it a "battle worn" appearance. Although not evident on the picture below, I did add an inner bevel. 
(Smooth technique, 500% depth, down direction, both size and soften at 5px, 90 degree angle, 30 degree altitude, default contour, grey highlight and shadow modes with 80% opacity)


          However,  the lighting doesn't match the rest of my cover, I have lighting at a 30 degree angle whilst this looks as if the light is shining directly in the middle and even after trying to move the reflections around it doesn't look authentic. I have researched making a chrome texture that will reflect an image in a realistic way, if I can create this is will look very realistic and fulfill the image I am trying to achieve. 

Quick google - http://tinyurl.com/qzgvecn
The tutorial - http://abduzeedo.com/captain-america-shield-photoshop

Elements of the Front Cover - Wax

          One of my ideas for creating a typical idea of fantasy was a wax stain on the front cover, as if the book had been sat next to candle and the wax had melted down the side and onto the cover of the book, adding another element of mystery as to the life the book has had. After much searching I found a suitable wax texture and used the selection brush to obtain a natural looking blot. I consulted with a textiles and costume student as to how wax would look after it had dried on black leather, put their advice into practice using a combination of blending modes, colour replacement and lighting techniques to try and achieve a natural looking finish.


          I wanted a seamless, natural look wax splat and I don't feel this filled that criteria so I have decided to abandon this element of my project as it looks to obvious and out of place, therefore taking attention away from the other nuances on the cover which are more important in creating a convincing, natural look. If I come across other techniques during my research that I think will improve the look of the wax then I will explore those options.

Wednesday, 26 February 2014

Elements of the Front Cover - Ripped Corner + Claw Marks Update

         One of the main elements I wanted to add to my cover was a burnt/ripped corner revealing the charred page I made before as this would be something that generates interest. I used the eraser tool to chip away at the layer mask to try and create a torn edge but this looked too obvious and therefore didn't look authentic. I downloaded a wrinkled page texture, and used the quick selection brush to outline a corner, this created a natural uneven tear selection. I rubbed out the selection area revealing the charred page that I created before however I felt this also looked too obvious and didn't create the convincing tear I wanted. I found 2 burnt pages on google, cut the edges and placed them above the charred page but below the leather this made it look a lot more realistic, apart from an edge that was too bright so I erased it.


Left - White edge - Right - After erasing


          Having looked at burnt books, my attempt looked too vibrant and didn't have the charred effect I wanted to achieve. I used the smudge tool to tweak parts of the leather cover into places whilst giving it a slight melted look and allowing me to tweak edges into place. To finish, I used the burn tool to darken the edges and the charred page underneath giving the impression that smoke was brushing against it.

         I was unhappy with my scratch marks but after applying a soft light blend mode, it improved drastically. This mode gave the underside of the leather the lighter effect it needed matching the lighting I had intended. This teamed with the drop shadow I applied resulted in a realistic finish. 

Before
After

Sunday, 23 February 2014

Elements of the Front Cover - Claw Marks + Charred Page

Although my latest design was more in line with my moodboard, I decided to use the ancient tome idea as this is closer to a traditional RPG, which is the focus of my project. I also believe that by using this design I will be able to demonstrate a lot more techniques.       

One element of my front cover is a torn, burnt edge of a page as I believe this will create interest as to how this happened. I started by obtaining a piece of parchment with scrawled scripture on it.


Original

         I cropped the excess paper around the edge as I wanted some of the writing to be obscured by the burn, I did this using the crop tool. I followed by using the polygonal lasso tool to create a uneven edge that looked torn and battered, I then smoothed out the edges that were too jagged using the smooth tool (in refine edge) and then created a new layer mask. Using a charcoal brush with the layer mask, I drew around the edge of the parchment to roughen the edges, then used a heavy smear wax brush to draw around the edges using colour #211a0a, this resulted in the edges looked burnt and charred. After duplicating the layer, I applied a Gaussian blur (filter - blur - Gaussian) and selected the darker colour blending mode. Finally, I downloaded a grungemap from cgtextures.com, set the opacity to 27% (this number allowed the effect to be seen but not be too overpowering) and selected the subtract blending mode before placing this above the other layers. 

Due to the amount of changes I was making and sometimes I had to step back a lot but PS's default value wasn't enough. I changed the history states to 100 by going to edit - preferences - general, clicking on performance and changing history states to 100. 

Also, I had to convert some of the images to 8 bit as that is the format I was using. I did this by selecting the image I wanted to convert, clicking image - mode and the bits I wanted to use.

End result

Another element of my front cover is some claw marks, again causing intrigue as to what caused them and why. After attempting to make my own brush, I decided to look for a template online. I managed to find a claw mark effect and removed it's inner shadow leaving just the outline. I copied this onto my front cover and drew on the front cover layer mask, removing the leather layer revealing the above parchment, therefore making it look as if the book has been scratched through revealing the page beneath. I need to find a way of making the grey overlap look like torn leather although I am still trialing a couple of scratch effects and my own brush creation, once this has been done I will compare which looks best and achieves the desired result.


- http://www.cgtextures.com/texview.php?id=45589
- http://www.youtube.com/watch?v=Mo0eqCEFCl4
- http://www.tutorial9.net/tutorials/photoshop-tutorials/create-burnt-parchment-from-scratch/
- http://www.photoshopgurus.com/forum/graphic-design-showroom/29678-ripped-metal-%7C-photoshop-psd-file-free-download.html

Sunday, 16 February 2014

Another Cover Draft and Possible Titles


          This cover is more in line with my mood board ideas, and contains elements that will hopefully intrigue consumers. The sword and wolf are the most immediate but looking a bit deeper a cave, skeletal sword, hooded figure, castle and travellers can be seen. On the right are potential titles and fonts for my cover, mainly revolving around a fantasy blade and fantastical fonts similar to those you may have seen.

Saturday, 15 February 2014

Intellectual Property Rights

          For my assignment I doubt I will be able to capture my own footage and even if I am, I won't be able to rely on it solely. I will be using images and video that are owned by other people or companies that are, at the very least, copyrighted. It is important that I take note of it as my work could be, at the very least, removed and destroyed for infringing on IP rights.

Patents

Patents are used when dealing with processes and inventions used in industry, a patent ensures that they are not used without authorisation. The government grant the inventor the right to make, use or sell their idea within a government appointed nation or territory. A patent typical takes 2 - 3 years to be approved.

Design Rights

The creator of the design holds the rights to it, unless they were employed and created the work under instruction from the company. This would result in the design being owned by the company/employer that commissioned the work. A design is the colour, material, shape, texture, orientation etc. of a product. To be registered as a design, its appearance must be noticeably different to other products on the market. 

Trademark

Names, words, slogans, designs, symbols, icons or other unique features that is associated with a product or company are items that can be trademarked. Similar to patents, trademarks are registered by a government body nation or territory wide however unlike patents, trademarks take between 6 - 18 months to be approved. Trademarks within countries protect your IP within that country only, the EU have a Community Trade Mark that protect across all EU countries. The Madrid Systems allows submission of a trademark to be applied to multiple countries at the same time and will most likely be approved by the national patent office. Trademark is often shorted to TM and it is illegal to use it in association with your IP until the application has been approved. In the US, trademarks are applied for products whilst services have a service-mark instead however, SMs have the same protection as trademarks. 

Copyright

Copyrights are applied to recorded works such as dramatic works, musical, artistic, literary, films, sound recordings etc. Copyright gives the creator rights of use, protecting against unauthorised use of their work and grants them the right to take legal action against those who infringe or copy their work. Copyright is immediately to anything someone makes that meets the above criteria however, it must be registered to grant you verifiable evidence of ownership. 

- https://www.copyrightservice.co.uk/protect/p15_design_rights
- https://www.copyrightservice.co.uk/copyright/intellectual_property

Mood Board + Update on Recording Problems

- Fantasy                            
- Might & Magic/Sword & Sorcery
- Warrior - Swordsmanship                           
Mage - Wisdom
- Archer - Stealth                                         
- Forests - Grass 
- Mystical                                                            
- Adventure 
- Dark vs Light/Good vs Evil            
- Mystical beasts - Races
- Immersive                                 
- Knights - Honour - Valour
- Tranquility


- All shots were taken by me, in engine - 
- Skyrim - Two Worlds II - Unigine Valley, Sanctuary & Heaven -


Recording Gameplay Update

          After trying various game recording software (see my prior post) and not being able to achieve either a stable recording or a watchable frame rate I asked users on forums and did my own research and have come up with the solution. I downloaded Dxtory, this recording software is very easy to use, has a lot of customisation options and has a minimal effect on frame rate when recording. However, even with a minor dip in performance the footage is very demanding, so I tweaked the ENB settings resulting in a 'performance' version that still looks fantastic and maintains a good frame rate whilst recording.